


[GUIDE][GT-S6102]
Increase Performance & Save Internal Memory
Using
Link2SD + A2SDGUI + Swapper
================================================
O.K,, I'll give method how to Increase Performance & Save Internal Memory For GT-S6102 [Galaxy Y Duos].
I will use 3 applications for this method..
- Link2SD
- A2SD GUI
- Swapper
Applications can be downloaded from google play..
For more details, Follow this GUIDE :
* make a nandroid backup using cwm before doing this method
1. We must have 3 partitions on sd card (FAT32, Ext2 & Swap)
2. Install Custom Kernel (init.d support)
3. Root Your phone..
4. Install Link2SD
5. Install A2SDGUI - Darktremor A2SD GUI
6. Increase Performance (Increase of RAM)
Download Swapper From Market @ Play Store (Google play)

How To use Swapper in this method :
a. After download & Install Swapper from Google play..
b. Run Swapper Configuration --> Tick Active Swap on Boot --> Swap File Position: SD Card FAT Partition --> Swap file size: 200 --> Save – Wait until finish…!!!

c. Now run A2SDGUI --> System Info:

Woow..
NOW YOU HAVE MORE PERFORMANCE & YOU CAN SAVE YOUR INTERNAL MEMORY…
maaf artikel ini saya kopi paste dari forum.xda-developers.com sengaja saya simpen buat dokumentasi sendiri dan barangkali bermanfaat bagi anda
Increase Performance & Save Internal Memory
Using
Link2SD + A2SDGUI + Swapper
================================================
O.K,, I'll give method how to Increase Performance & Save Internal Memory For GT-S6102 [Galaxy Y Duos].
I will use 3 applications for this method..
- Link2SD
- A2SD GUI
- Swapper
Applications can be downloaded from google play..
For more details, Follow this GUIDE :
* make a nandroid backup using cwm before doing this method
1. We must have 3 partitions on sd card (FAT32, Ext2 & Swap)
Quote:

2. Install Custom Kernel (init.d support)
Quote:
| You can try iDuos Kernel 1.3.1 Thanks manoranjan2050 for Great Kernel.. Visit this thread to download iDuos Kernel 1.3.1 http://forum.xda-developers.com/show....php?t=1707029 @ #1 –> Download - > iDuos 1.3.1 Update.Zip Install iDuos Kernel from CWM Visit this thread to download CWM for Galaxy Y Duos http://forum.xda-developers.com/showpost.php?p=25140720 Thanks Millan.SIS for Great CWM.. How To Install iDuos Kernel 1.3.1 : a. After download CWM-try1.zip & iDuos 1.3.1_install.zip - - put to root of your sd card b. Boot Stock Recovery (Press & hold: Power + Volume Up + Home keys & release when sgy duos logo appears) c. Choose: apply update from sdcard d. Choose: CWM-try1.zip e. Choose: install zip from sdcard f. Choose: choose zip from sdcard g. Choose: iDuos 1.3.1_install.zip h. Choose: Yes – Install … i. Press Back key - - reboot system now After reboot, check kernel (Settings --> About phone) :  |
3. Root Your phone..
Quote:
Download Root from here : http://forum.xda-developers.com/show....php?t=1611830 Thanks To Millan.SIS How To Root Your phone.. a. After download update_3.zip- - put to the root of your sd card b. Boot Stock Recovery (Press & hold: Power + Volume Up + Home keys & release when sgy duos logo appears) c. Choose: apply update from sdcard d. Choose: update_3.zip e. reboot system now f. Please check in app drawer, do you have Superuser icon? If yes, You've already rooted your phone..  |
4. Install Link2SD
Quote:
Download From Market @ Play Store (Google play)  How to use Link2SD in this method : a. After download & Install Link2SD from Google play b. Go to : Settings --> Applications --> Development --> Tick USB Debugging & Allow mock locations  c. Run Link2sd & do it like this :       d. Turn on Your phone --> run Link2sd again & check..   |
5. Install A2SDGUI - Darktremor A2SD GUI
Quote:
Download A2SD GUI From Market @ Play Store (Google play)  How To use A2SDGUI in this method : a. After download & Install A2SDGUI from Google play.. b. Run A2SDGUI – if A2SDGUI can’t start..  Don’t worry.. c. Reboot Your phone.. d. Boot Stock Recovery (Press & hold: Power + Volume Up + Home keys & release when sgy duos logo appears) e. Apply update from sdcard --> CWM-try1.zip --> install zip from sd card --> choose zip from sdcard --> dtapps2sd-2.7.5.3-beta04-signed.zip --> Yes – Install --> Reboot system.. Download dtapps2sd-2.7.5.3-beta04-signed.zip from here : http://forum.xda-developers.com/showthread.php?t=715940 Thanks To tkirton for Great App & Scripts.. f. Run A2SDGUI.. Now A2SDGUI Working..    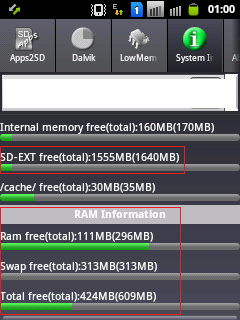 Don't tick Dalvik Cache on SD-EXT..!!! Don't tick Dalvik Cache on /cache..!!! |
6. Increase Performance (Increase of RAM)
Quote:
Download Swapper From Market @ Play Store (Google play)
How To use Swapper in this method :
a. After download & Install Swapper from Google play..
b. Run Swapper Configuration --> Tick Active Swap on Boot --> Swap File Position: SD Card FAT Partition --> Swap file size: 200 --> Save – Wait until finish…!!!
c. Now run A2SDGUI --> System Info:
Woow..
NOW YOU HAVE MORE PERFORMANCE & YOU CAN SAVE YOUR INTERNAL MEMORY…
maaf artikel ini saya kopi paste dari forum.xda-developers.com sengaja saya simpen buat dokumentasi sendiri dan barangkali bermanfaat bagi anda
 → Link2SD + A2SDGUI + Swapper Samsung galaxi Y Duos